Testing Flutter Apps: A Beginner’s Guide to Unit Tests
In our previous article, Building a D&D API Explorer: A Flutter Guide to HTTP and JSON, we explored how to make HTTP requests and handle JSON responses. Now, we’ll shift our focus to a key part of ensuring your app is reliable: testing. Writing tests can help you catch issues early, improve code quality, and ensure that your app behaves as expected, even in edge cases.

In this article, we’ll break down the essentials of unit testing in Flutter and show you how to craft effective test cases that catch bugs before they hit production. Through hands-on examples, you’ll learn how to test a simple app step-by-step. Best of all, you can follow along directly in DartPad, so no need to set up a full IDE — just jump straight into the action!Why Testing Is Important
Testing is essential in app development because it ensures that your app functions correctly under different conditions and scenarios. A thorough testing process:
- Helps catch bugs early in development.
- Improves the quality and reliability of your code.
- Makes refactoring safer by ensuring that existing functionality still works.
- Allows your app to handle edge cases gracefully, reducing the risk of crashes or unexpected behavior.
Good tests help ensure that your app functions correctly not only in ideal conditions but also in situations where users might do the unexpected.
Thinking Through Test Cases
Before writing tests, it’s essential to think through possible test cases. When designing test cases, consider both positive and negative scenarios:
- Positive Test Cases: These ensure that your app behaves correctly in ideal conditions. For example, a calculator app should return the correct sum when valid numbers are entered.
- Negative Test Cases: These test how your app handles unexpected or incorrect input. For example, if a user enters letters into a numeric input field, will the app crash, or will it handle the error gracefully?
Let’s consider an example of a form where users can enter a value into a numeric field. It’s common to restrict the input to numbers, but what if the user pastes text with letters? We need to ensure that the app handles this gracefully, rather than crashing.
Thinking through potential edge cases like this can save you from bugs in the future. By identifying and testing for these scenarios early on, you’ll catch issues before they impact your users.
Unit Testing in Flutter
Unit testing focuses on testing individual functions or classes in isolation from the rest of the app. It’s a great way to verify that your app’s business logic works correctly.

Example: Testing a Simple Flutter Class
Let’s consider a simple app that tracks calories. The app has a CalorieTracker class that keeps track of the total calorie intake for the day. We’ll write tests to ensure the functionality works as expected and handles edge cases.
Here’s the CalorieTracker class:
class CalorieTracker {
  int _totalCalories = 0;

  int get totalCalories => _totalCalories;
  void addCalories(int calories) {
    if (calories < 0) {
      throw ArgumentError('Calories cannot be negative');
    }
    _totalCalories += calories;
  }
  void resetCalories() {
    _totalCalories = 0;
  }
}
Designing Test Cases
Before jumping into writing the tests, let’s outline what we need to check:
- Initial State: The tracker should start with 0 calories.
- Adding Calories: When adding calories, the total should increase.
- Resetting: When resetting, the total should return to 0.
- Negative Calories: The app should throw an error if negative calories are added.
Now that we have our test cases, let’s write unit tests for the CalorieTracker class.
import 'package:flutter_test/flutter_test.dart';

void main() {
  group('CalorieTracker Tests', () {
    late CalorieTracker tracker;

    setUp(() {
      tracker = CalorieTracker();
    });

    test('Initial calories should be zero', () {
      expect(tracker.totalCalories, 0);
    });

    test('Adding calories should increase total', () {
      tracker.addCalories(100);
      expect(tracker.totalCalories, 100);
    });

    test('Resetting calories should set total to zero', () {
      tracker.addCalories(200);
      tracker.resetCalories();
      expect(tracker.totalCalories, 0);
    });

    test('Adding negative calories should throw error', () {
      expect(() => tracker.addCalories(-50), throwsArgumentError);
    });
  });
}
Explanation of the Tests

- Initial Test Case: We check that the tracker starts with 0 calories.
- Positive Test Case: Adding calories works correctly and increases the total.
- Negative Test Case: Resetting the tracker resets the calorie count to 0.
- Edge Case: We check that adding negative calories throws an error, preventing invalid input.
Negative Scenarios and Edge Cases
One of the most critical aspects of testing is covering negative scenarios. In the example above, we handle negative input by ensuring that adding negative calories throws an error. Without this test, we might have missed the bug and only caught it when the app failed in production.
Another common mistake is relying solely on UI restrictions, such as limiting input to numbers through keyboard types. Users might still paste invalid input, so it’s crucial to test those edge cases. Writing comprehensive tests helps ensure that your app behaves reliably, even when users do the unexpected.
Let’s now create an input validation class that checks if an input is a numeric value and has a specific length (6 to 10 digits). This introduces additional complexity and tests for various edge cases.
Example: Text Input Validation with Length Limit
Here’s the TextInputValidator class that checks whether the input is a valid number and meets the length requirement:
class TextInputValidator {
  bool isValidInput(String input) {
    final numericRegex = RegExp(r'^[0-9]{6,10}$');
    return numericRegex.hasMatch(input);
  }
}
This regular expression ensures that only numbers between 6 and 10 digits are considered valid input. Now, let’s create a set of test cases to validate this functionality.
Test Cases for Input Validation
Here’s how we can test different scenarios for the input validation:
import 'package:flutter_test/flutter_test.dart';
void main() {
group('TextInputValidator Tests', () {
late TextInputValidator validator;
setUp(() {
validator = TextInputValidator();
});
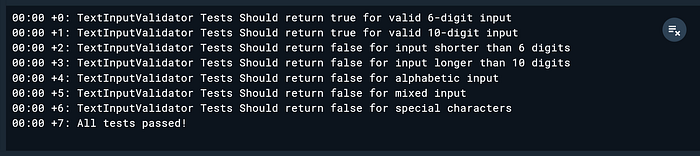
test('Should return true for valid 6-digit input', () {
expect(validator.isValidInput('123456'), true);
});
test('Should return true for valid 10-digit input', () {
expect(validator.isValidInput('1234567890'), true);
});
test('Should return false for input shorter than 6 digits', () {
expect(validator.isValidInput('12345'), false);
});
test('Should return false for input longer than 10 digits', () {
expect(validator.isValidInput('12345678901'), false);
});
test('Should return false for alphabetic input', () {
expect(validator.isValidInput('abcdef'), false);
});
test('Should return false for mixed input', () {
expect(validator.isValidInput('123abc'), false);
});
test('Should return false for special characters', () {
expect(validator.isValidInput('123!@#'), false);
});
});
}Explanation of the Tests
- Valid Input Test Cases: We check that the input is valid when it contains only numbers and is between 6 and 10 digits in length.
- Edge Case: We test for cases where the input is too short or too long, ensuring the validation fails correctly.
- Invalid Input Test Cases: These tests check that alphabetic characters, mixed input (letters and numbers), and special characters are rejected.
Why This Matters
This type of testing ensures that the app works correctly not only under ideal circumstances but also when users input invalid or unexpected data. By catching these cases early through testing, you can prevent bugs from affecting your app in production.
Conclusion
In this article, we explored the importance of testing in Flutter, with a specific focus on unit tests. We covered:
- Why testing is essential for app reliability and quality.
- How to think through test cases, covering both positive and negative scenarios.
- Writing unit tests for common scenarios, such as a calorie tracker or input validator, while handling both valid and invalid inputs.
By thoroughly considering and testing edge cases, you’ll create more robust, reliable, and secure applications. Testing might seem like extra work, but it pays off by ensuring your app runs smoothly in all conditions.
For a deeper dive into testing strategies, you can explore our previous articles, The Art of Mobile Testing: Strategies for Success and Reinforcing Quality: Strategically Integrating Tests into Your Architecture. These articles cover advanced topics like structuring test suites, choosing the right testing tools, and ensuring comprehensive coverage across your application. By expanding your testing knowledge, you’ll be able to further enhance the quality and reliability of your apps.
Feel free to share your progress, questions, or suggestions in the comments. Don’t forget to subscribe for more tutorials, and keep pushing your Flutter skills to the next level!